Help · Setting up your first job
Setting up your first job
Written for TableDI 2.0.0 on macOS · updated 2026-09-11
A job is a task you set up once and run again every period: this month's bank statement matched against the sales ledger, the store exports summed up by store, and next month the same again with new files. To make one, click New job on the Jobs screen, add this period's files, say in one sentence what you need out of them, and click Save and run the first period. TableDI 2 runs the first period on those files straight away, so you see the result, the differences and the exceptions before you set anything else up.
You don't need an AI key. With one, TableDI 2 drafts the steps from your files; without one, you fill in five short steps yourself. Both paths build the same kind of job, and running it in later periods never involves AI.
The free version keeps one job, with no time limit, which is enough to run a second period before you decide anything. Keeping a second job is in the lifetime version.
Before you start
- TableDI 2 runs on macOS, on Apple silicon and Intel Macs. A Windows version is in progress. Get it from the download page. It installs next to TableDI 0.0.9 and doesn't touch it; see Bring your data from TableDI 0.0.9.
- Use Excel (.xlsx) or CSV files that sit in a folder on your disk. An old
.xlshas to be saved as.xlsxfirst, and a file with a password needs the password taken off in Excel. For bank statements, download the CSV or Excel version from your bank: in 2.0.0 a job doesn't read PDF statements yet. - Have this period's files ready, the ones you would otherwise open in Excel this month. The job is built on their columns.
Step 1 · Drop the files
- On Jobs, click New job. On the very first launch you can also drop files onto Use my files.
- Under This period’s files, drop one to five files, or click to choose them. Each file shows how many rows it has; Remove takes one out.
- Click Say what you need.
Most jobs start from two files: the one you are checking and the one you check it against. Without an AI key, the five-step form needs two files, and with only one the screen says Matching two sheets against each other needs two files. Drop the second one in.
Step 2 · Say what you need
In What do you need out of these every month?, write one sentence. For example: Match the bank statement against the sales ledger each month, find what hasn’t come in and where the amounts disagree, and give the finance lead one sheet summed up by customer.
What happens next depends on whether an AI key is saved in Settings → AI:
With a key, a draft appears under A draft, from your files. Every step is an ordinary rule — change or delete any of them. The numbers on it come from running the draft on your files. If the draft left something open, it asks up to two questions; pick an answer for each. Then click the draft's Save and run the first period to go on to the last step. The draft is requested as soon as you've written the sentence and added the files; what that request carries is listed in Where the network goes, and your AI key.
Without a key, the screen says No AI key is set, so the steps below are yours to fill in. Same job either way. Fill in Build it in five steps:
- 1 · Which two sheets go against each other — the left is the side you are checking, the right is what you check it against.
- 2 · Which column says two rows are the same thing — the key on each side, such as an invoice or reference number. Lost leading zeros and stray spaces are handled for you.
- 3 · How far apart the amounts may be — the Tolerance. Anything further apart is listed as a difference.
- 4 · What the result is summed up by — a column to Sum up by and which figures to Add up, or Don’t sum up — one row per matched row.
- 5 · What comes out at the end — Excel · summary, detail and exceptions, CSV or PDF summary, one page. You can change the template and who gets it later.
Click Try these steps to run them on your files, then Next.
Step 3 · Confirm and run the first period
Under Save as a job:
- Name — up to 40 characters, and different from your other jobs. If it's taken, TableDI 2 suggests a free name; click the suggestion to use it.
- This period — the label for this first period. It's read from the file names when they carry a month (
202609_bank.csvgives2026-09); otherwise type it:2026-09for a month,2026-W36for a week,2026-09-06for a date. - How often — By day 5 each month, Every Monday, or When you say so. This decides when the job shows up as due.
- Where next period’s files will be — the folder next period's files will land in. Choose folder picks it; leave it empty for No folder — I’ll pick the files each time. When your file names carry a date, TableDI 2 shows the name pattern it will look for next period.
Then click Save and run the first period. The job is saved, the first period runs as This period only, and you land on the job's Overview with the result, the differences and the exceptions. What to do there is in Running this period.
Just this once · export the result, don’t save takes the same files to Do it once instead: you get the result and can export it, and no job is kept. That is free, with no limit on how often.
The free version keeps one job. Once you have one, the confirm step shows the lifetime card for keeping another.
What a job is made of
- Sources — the files that come in each period, each with a short name like Bank statement.
- Rules — the steps that turn the sources into the result: import mapping, clean, match, difference, summary, computed columns, delivery. They're on the job's Rules tab; see Changing a rule.
- Result — the table the steps produce, on the Result tab.
- Delivery — what goes out at the end and where, on the Delivery tab.
Each period runs the same rules on new files. That's why the first period takes a few minutes and the ones after it take a few clicks.
Finding the job again
The job appears on Jobs, grouped by what it needs from you: Needs you, Delivered and Not due yet. Each card has one button, and its label follows the state: Do this period when files are due, See exceptions when rows are waiting for you, Make the delivery when the period is done, Open once it's delivered, and Run one now for a job that isn't due yet.
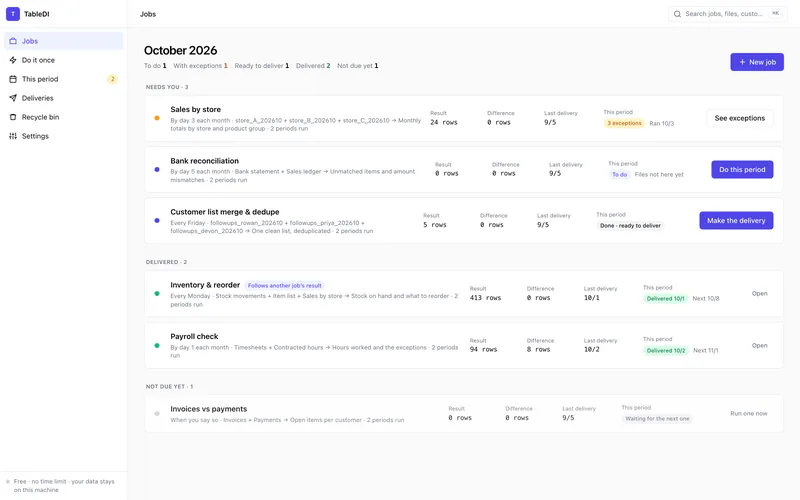
This period in the sidebar lists the jobs with a due date, soonest first.
If something goes wrong
- These files have no folder on disk, so there is nothing to re-run next period. A job needs to know where next period's files will come from. Save the files into a folder, drop them from there, or use Do it once for a one-off.
- You already have a job called that. Pick another name, or click the suggested one.
- Next stays grayed out on the second step. Without an AI key, the five steps need two files and a key column on both sides.
- A file shows an error instead of a row count. It's usually an old
.xlsor a file with a password; save it again from Excel as.xlsxwithout a password and drop it in.
Still stuck? Email us — one inbox, read by the people who build TableDI.